
Exploring Shooting Modes and Advanced Settings for Picture-Perfect Results
Unlocking the Full Potential of Your GardePro Trail Camera
GardePro Trail cameras are invaluable tools for capturing the wonders of the natural world, from elusive wildlife to stunning landscapes. To make the most of your GardePro trail camera, it's essential to understand its shooting settings. In this comprehensive guide, we will delve into the various shooting modes and advanced settings that will elevate your GardePro trail camera photography and videography to the next level.
1.Shooting Modes


Motion Detection
One of the fundamental features of GardePro trail cameras is motion detection. This mode allows your camera to spring into action as soon as it detects any movement within its field of view. Whether you're tracking the movements of wildlife or monitoring your property for security, motion detection mode is your go-to option.
Scenario 1: Wildlife in Action
Imagine you've set up your GardePro trail camera in a remote forest. With motion detection enabled, your camera captures stunning images of a family of deer as they graze peacefully. Without this mode, you'd miss these magical moments.
Scenario 2: Property Surveillance
Use motion detection to keep an eye on your property. Catch potential intruders or unexpected visitors in the act. Motion detection ensures that your camera is only active when something is happening, saving battery life and storage space.
Time-lapse
Time-lapse mode allows you to capture images or videos at predefined intervals over a specific period. This feature is perfect for creating captivating sequences that showcase the passage of time, such as changing seasons or animal behavior.
Scenario 1: Changing Seasons
Set your camera on time-lapse mode in your backyard and capture the beauty of each season. From the vibrant colors of fall leaves to the first blooms of spring, time-lapse allows you to witness nature's transformations.
Scenario 2: Wildlife Behavior
Observe and document the daily routines of wildlife with time-lapse. You might record a fox visiting the same spot every night or the growth of a bird's nest from eggs to fledglings.
Hybrid
Hybrid mode combines the features of both motion detection and time-lapse. This versatile mode is a game-changer for your GardePro trail camera setups, providing the best of both worlds.
Scenario 1: Comprehensive Wildlife Monitoring
In a wildlife research project, you can use hybrid mode to capture both spontaneous animal movements (motion detection) and long-term behavioral patterns (time-lapse). This comprehensive approach yields a wealth of data.
Scenario 2: Property Security with Context
When monitoring your property, hybrid mode ensures that any detected motion is contextualized within the broader timeline of your time-lapse footage. This can be invaluable for understanding events.
2.Capture Settings
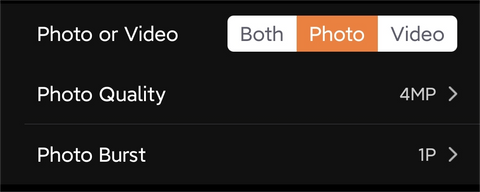
Photo or Video
The choice between taking photos or videos, or capturing both simultaneously, depends on your specific needs and preferences.
Scenario 1: Wildlife Identification
If your primary goal is identifying wildlife, opt for photos. They provide clear snapshots that make it easier to identify different species and individuals.
Scenario 2: Behavioral Study
For in-depth behavioral studies, capturing videos alongside photos allows you to analyze animal interactions and movements in greater detail.
Photo Quality
Select the pixel resolution for your photos, with some models supporting up to an impressive 48MP. Understanding the difference in image quality at various settings is crucial.
Scenario 1: Print-Worthy Shots
If you plan to print your photos or display them on a large screen, higher resolution settings like 48MP ensure stunning, detailed prints.
Scenario 2: Online Sharing
For photos destined for online sharing, lower resolutions can save storage space and upload time while still delivering quality images.
Photo Burst
Customize the number of photos taken in a burst – from 1P to 5P. Burst mode is your best friend when it comes to capturing fast-paced action.
Scenario 1: Capturing Fast Wildlife
When an animal is in motion, a burst of photos increases your chances of getting the perfect shot. This is invaluable for animals with erratic movements like birds in flight.
Scenario 2: Sports and Adventure
GardePro Trail cameras aren't just for wildlife. Capture the excitement of extreme sports or outdoor adventures with burst mode, ensuring you never miss a thrilling moments.
4.Video Settings

Video Quality: 720P, 1080P, some models can reach 1296P
Your GardePro trail camera offers a range of video quality options, allowing you to tailor your footage to your exact needs.
Scenario 1: Capturing Crisp Details with 1080P
Selecting 1080P provides high-definition video, perfect for wildlife enthusiasts looking to capture intricate details like feather patterns or subtle animal movements. This setting ensures your videos are packed with clarity and rich color.
Scenario 2: Unveiling the Extraordinary with 1296P
For those with advanced models, the 1296P option takes your videos to a whole new level. This setting offers astonishing detail, making it ideal for researchers or avid naturalists keen on every nuance of the wildlife world.
Video Length (Daytime): 3 seconds up to 5 minutes
When it comes to daytime recording, flexibility is key. Your GardePro trail camera allows you to choose video lengths ranging from quick snippets to more extended sequences.
Scenario 1: Swift Animal Activity
Imagine a deer gracefully bounding through your camera's field of view. With a short 3-second daytime video, you capture the essence of the moment without missing a beat.
Scenario 2: Monitoring Feeding Behavior
For more prolonged observations, like tracking the feeding habits of a particular animal, a 5-minute daytime video offers an in-depth look at their behavior and preferences.
Video Length (Night): 3 seconds up to 5 minutes
Nighttime brings a different set of opportunities and challenges. Your GardePro trail camera gives you the power to choose video lengths under low light conditions, ensuring you don't miss any nocturnal action.
Scenario 1: Nocturnal Visitors
As darkness falls, a raccoon family emerges from the shadows. With a 3-second nighttime video, you capture their presence and movements, shedding light on their nightly routines.
Scenario 2: Nighttime Interactions
Extended nighttime videos come in handy when observing interactions between different nocturnal species, providing valuable insights into their social dynamics.
Video Sound: Turn On or Off
The presence of audio in your videos adds an extra layer of depth to your footage. Depending on your preferences and specific use cases, you have the option to include ambient sounds in your recordings.
Scenario 1: Documenting Natural Soundscape
For nature enthusiasts, having video sound enabled offers an immersive experience. Capture the rustle of leaves, the calls of birds, and the whisper of the wind for a complete sensory experience.
Scenario 2: Silent Surveillance
In situations where stealth is crucial, turning off video sound ensures that your camera operates discreetly, capturing visuals without drawing attention to its presence.
Video Format: MP4, MOV
Your GardePro trail camera supports two popular video formats: MP4 and MOV. Each format has its advantages, so let's explore when to use each.
Scenario 1: Universal Compatibility with MP4
MP4 is a widely supported video format, making it an excellent choice for easy sharing and playback on various devices. This format ensures your videos can be viewed seamlessly across different platforms.
Scenario 2: Editing Flexibility with MOV
If you're planning to edit your footage later, MOV is a great option. This format retains high-quality video data, allowing for more extensive editing without compromising on clarity or detail.
4.Detection and Recording Settings

Detection Delay
Set a delay for motion detection, ranging from 0 to 1 hour. This setting can be used strategically in different scenarios.
Scenario 1: Minimizing False Triggers
In a windy area with branches constantly moving, setting a short delay can help reduce false triggers. Your camera will wait a moment before reacting to ensure it captures only meaningful events.
Scenario 2: Wildlife Patterns
For research purposes, a longer delay might be beneficial. Some animals have predictable patterns, and a delay ensures your camera captures them at the right moment.
PIR Sensitivity
Adjust PIR (Passive Infrared) sensitivity to low, medium, or high. Understanding how sensitivity impacts motion detection accuracy is essential.
Scenario 1: High Traffic Areas
In areas with frequent wildlife activity, higher sensitivity is ideal. It ensures that even small movements trigger the camera.
Scenario 2: Conservation Research
In research settings where you want to capture only larger animals or specific behaviors, lower sensitivity can help filter out unwanted footage.
Side Motion Sensors
Toggle side motion sensors on or off (note: not available on some models). Learn when and why to use this feature.
Scenario 1: Wide Coverage
In open areas or where animals approach from various angles, side motion sensors provide broader coverage, reducing the risk of missed shots.
Scenario 2: Precise Monitoring
In specific situations where you want to focus on a single path or area, disabling side sensors can prevent unnecessary triggers and conserve battery life.
Loop Recording
Enable or disable loop recording to ensure you never miss a moment. Explore the benefits of this setting for continuous surveillance.
Scenario 1: Non-Stop Monitoring
For security purposes, loop recording ensures that your camera is always active, recording over the oldest footage when storage is full, ensuring continuous surveillance.
Scenario 2: Capturing Rare Events
In wildlife observation, loop recording ensures that your camera is always ready to capture rare and unexpected events without worrying about storage limitations.
5.Time and Information Settings

Operation Hours
Set the start and end time for your camera's operation. Discover how to optimize battery life and capture activity during specific hours.
Scenario 1: Nocturnal Wildlife
If you're interested in nocturnal wildlife, configure your camera to operate during nighttime hours when most of the action occurs.
Scenario 2: Daytime Observation
For daytime observations or property security, limit operation to daylight hours to conserve power and storage.
Info Strip
Turn on or off the information strip on your photos or videos. Learn how this feature can enhance the context of your captures.
Scenario 1: Scientific Documentation
When conducting scientific research, including an information strip with timestamps and settings helps maintain accurate records.
Scenario 2: Aesthetic Presentation
For artistic or personal use, turning off the info strip allows your photos and videos to be more visually appealing without distracting text.
Date and Time Format
Customize the date and time format to your preference – M/D/Y, D/M/Y, or Y/M/D, and choose between 12-hour and 24-hour time formats.
Scenario 1: International Collaboration**
In international research projects, standardizing the date and time format across cameras ensures consistency in data collection and analysis.
Scenario 2: Personal Preference
Choose the format that best suits your personal preference and makes it easier for you to read and interpret your camera's timestamps.
Time Zone
Adjust the camera's time zone for accurate timestamping.
Scenario 1: Remote Locations
When setting up GardePro trail cameras in different time zones, ensure that the timestamps accurately reflect local time, crucial for scientific research or security monitoring.
Scenario 2: Daylight Saving Time
Account for daylight saving time changes to maintain accurate records, especially in areas that observe this practice.
6.Maintenance and Reset

Factory Reset
Learn how to perform a factory reset to restore your camera to its default settings.
Scenario 1: Troubleshooting
If your camera experiences issues or malfunctions, a factory reset can often resolve software-related problems.
Scenario 2: Passing It On
Before selling or gifting your GardePro trail camera, perform a factory reset to erase your settings and data, ensuring the new owner starts with a clean slate.
Format SD Card
Discover the importance of regularly formatting your SD card for optimal performance and storage management.
Scenario 1: Prevent Data Corruption
Regularly formatting your SD card helps prevent data corruption, ensuring your camera operates smoothly and reliably.
Scenario 2: Efficient Storage
Formatting clears the card, allowing for efficient storage use and preventing the need to delete files manually.
With this comprehensive guide to your GardePro trail camera's shooting settings, you'll be well-equipped to capture breathtaking moments in the wild and beyond. Explore each setting's unique capabilities through real-world examples, and take your GardePro trail camera photography to new heights.